实现步骤及效果呈现如下:
1.创建数据库表:
表名:file_test

存储后的数据:

2.创建数据库表对应映射的实体类:
import com.baomidou.mybatisplus.annotation.IdType;
import com.baomidou.mybatisplus.annotation.TableField;
import com.baomidou.mybatisplus.annotation.TableId;
import com.baomidou.mybatisplus.annotation.TableName;
import lombok.AllArgsConstructor;
import lombok.Data;
import lombok.NoArgsConstructor;
import java.util.Date;
/**
* 文件实体类
*/
@Data
@AllArgsConstructor
@NoArgsConstructor
@TableName("file_test")
public class File {
/**
* 主键id
*/
@TableId(value = "id",type = IdType.AUTO)
private Integer id;
/**
* 文件名称
*/
@TableField("file_name")
private String fileName;
/**
* 文件路径
*/
@TableField("file_path")
private String filePath;
/**
* 上传时间
*/
@TableField("upload_time")
private Date uploadTime;
}
- 创建数据访问层Mapper(用来写数据库的增删改查SQL)
import com.baomidou.mybatisplus.core.mapper.BaseMapper;
import com.fm.model.File;
import org.apache.ibatis.annotations.Mapper;
/**
* 数据库映射
* 集成了mybtis-plus 包含了常用的增删改查方法
*/
@Mapper
public interface FileMapper extends BaseMapper<File> {
}
- 创建业务层service
import com.baomidou.mybatisplus.extension.service.IService;
import com.fm.model.File;
import org.springframework.web.multipart.MultipartFile;
/**
* 文件业务层
* 集成了mybatis-plus 里面包含了数据库常用的增删改成方法
*/
public interface FileService extends IService<File> {
void upload(MultipartFile file);
}
- 创建业务实现类serviceImpl
import com.baomidou.mybatisplus.extension.service.impl.ServiceImpl;
import com.fm.mapper.FileMapper;
import com.fm.model.File;
import com.fm.service.FileService;
import org.springframework.stereotype.Service;
import org.springframework.web.multipart.MultipartFile;
import javax.annotation.Resource;
import java.io.IOException;
import java.util.Date;
/**
* 文件业务实现层
* 集成了mybatis-plus 里面包含了数据库常用的增删改成方法
*/
@Service
public class FileServiceImpl extends ServiceImpl<FileMapper, File> implements FileService {
@Resource
private FileMapper fileMapper;
@Override
public void upload(MultipartFile file) {
//获取当前项目所在根目录
String rootDirectory = System.getProperty("user.dir");
//如果当前项目根目录不存在(file_manage文件存储)文件夹,
// 会自动创建该文件夹用于存储项目上传的文件
java.io.File savaFile = new java.io.File(rootDirectory + "/file_manage项目文件存储/" + file.getOriginalFilename());
if (!savaFile.getParentFile().exists()) {
savaFile.getParentFile().mkdirs();
}
//如果当前名称的文件已存在则跳过
if (savaFile.exists()) {
return;
}
try {
savaFile.createNewFile();
file.transferTo(savaFile);
} catch (IOException e) {
e.printStackTrace();
}
File file1 = new File();
file1.setFileName(file.getOriginalFilename());
file1.setFilePath("/file_manage项目文件存储/" + file.getOriginalFilename());
file1.setUploadTime(new Date());
fileMapper.insert(file1);
}
}
- 创建接口层controller(用来写上传、下载、查询列表、删除接口)
import com.fm.model.File;
import com.fm.service.FileService;
import com.fm.util.FileUtil;
import org.springframework.web.bind.annotation.*;
import org.springframework.web.multipart.MultipartFile;
import javax.annotation.Resource;
import javax.servlet.http.HttpServletRequest;
import javax.servlet.http.HttpServletResponse;
import java.util.List;
/**
* 文件接口层
*/
@CrossOrigin
@RestController
@RequestMapping("/file")
public class FileController {
//文件实现层
@Resource
private FileService fileService;
/**
* 文件列表
*/
@RequestMapping(value = "/list", method = RequestMethod.GET)
public List<File> list(
) {
try {
List<File> list = fileService.list();
return list;
} catch (Exception e) {
e.printStackTrace();
}
return null;
}
/**
* 上传文件
*
* @param file
* @return
*/
@RequestMapping(value = "/upload", method = RequestMethod.POST)
public String upload(
@RequestParam(value = "file") MultipartFile file//文件
) {
try {
fileService.upload(file);
return "文件上传成功!";
} catch (Exception e) {
e.printStackTrace();
return "文件上传失败!";
}
}
/**
* 删除文件
*
* @param fileId
* @return
*/
@RequestMapping(value = "/delete", method = RequestMethod.DELETE)
public String delete(
@RequestParam(value = "fileId") String fileId//文件
) {
try {
File file = fileService.getById(fileId);
//获取当前项目所在根目录
String rootDirectory = System.getProperty("user.dir");
java.io.File savaFile = new java.io.File(rootDirectory + file.getFilePath());
//删除保存的文件
savaFile.delete();
boolean b = fileService.removeById(fileId);
if (b){
return "成功!";
}
return "失败!";
} catch (Exception e) {
e.printStackTrace();
return "失败";
}
}
/**
* 下载文件
*/
@RequestMapping(value = "/download", method = RequestMethod.GET)
public void download(@RequestParam(value = "fileId") String fileId,
HttpServletResponse response, HttpServletRequest request
) {
try {
File file = fileService.getById(fileId);
if (file != null) {
//获取当前项目所在根目录
String rootDirectory = System.getProperty("user.dir");
//调用自主实现的下载文件工具类中下载文件的方法
FileUtil.doDownloadFile(rootDirectory + file.getFilePath(), response, request);
}
} catch (Exception e) {
e.printStackTrace();
System.out.println("下载文件出错,错误原因:" + e);
}
}
}
- 文件工具类(用来写下载文件的方法)
/**
* 文件工具类
*/
public class FileUtil {
/**
* 下载文件
* @param Path
* @param response
* @param request
*/
public static void doDownloadFile(String Path, HttpServletResponse response, HttpServletRequest request) {
try {
//关键点,需要获取的文件所在文件系统的目录,定位准确才可以顺利下载文件
String filePath = Path;
File file = new File(filePath);
//创建一个输入流,将读取到的文件保存到输入流
InputStream fis = new BufferedInputStream(new FileInputStream(filePath));
byte[] buffer = new byte[fis.available()];
fis.read(buffer);
fis.close();
// 清空response
response.reset();
// 重要,设置response的Header
response.setHeader("Content-Disposition", "attachment;filename=" + new String(file.getName().getBytes()));
response.setHeader("Content-Length", "" + file.length());
//octet-stream是二进制流传输,当不知文件类型时都可以用此属性
response.setContentType("application/octet-stream");
//跨域请求,*代表允许全部类型
response.setHeader("Access-Control-Allow-Origin", "*");
//允许请求方式
response.setHeader("Access-Control-Allow-Methods", "POST, GET, OPTIONS, DELETE");
//用来指定本次预检请求的有效期,单位为秒,在此期间不用发出另一条预检请求
response.setHeader("Access-Control-Max-Age", "3600");
//请求包含的字段内容,如有多个可用哪个逗号分隔如下
response.setHeader("Access-Control-Allow-Headers", "content-type,x-requested-with,Authorization, x-ui-request,lang");
//访问控制允许凭据,true为允许
response.setHeader("Access-Control-Allow-Credentials", "true");
//创建一个输出流,用于输出文件
OutputStream oStream = new BufferedOutputStream(response.getOutputStream());
//写入输出文件
oStream.write(buffer);
oStream.flush();
oStream.close();
} catch (Exception e) {
System.out.println("下载日志文件出错,错误原因:" + e);
}
}
}
Pom文件依赖
<?xml version="1.0" encoding="UTF-8"?>
<project xmlns="http://maven.apache.org/POM/4.0.0" xmlns:xsi="http://www.w3.org/2001/XMLSchema-instance"
xsi:schemaLocation="http://maven.apache.org/POM/4.0.0 https://maven.apache.org/xsd/maven-4.0.0.xsd">
<modelVersion>4.0.0</modelVersion>
<parent>
<groupId>org.springframework.boot</groupId>
<artifactId>spring-boot-starter-parent</artifactId>
<version>2.3.12.RELEASE</version>
<relativePath/> <!-- lookup parent from repository -->
</parent>
<groupId>com.fm</groupId>
<artifactId>file_manage</artifactId>
<version>0.0.1-SNAPSHOT</version>
<name>file_manage</name>
<description>file_manage</description>
<properties>
<java.version>22</java.version>
</properties>
<dependencies>
<dependency>
<groupId>org.springframework.boot</groupId>
<artifactId>spring-boot-starter-web</artifactId>
</dependency>
<dependency>
<groupId>org.projectlombok</groupId>
<artifactId>lombok</artifactId>
<optional>true</optional>
</dependency>
<dependency>
<groupId>org.springframework.boot</groupId>
<artifactId>spring-boot-starter-test</artifactId>
<scope>test</scope>
</dependency>
<!-- mysql依赖-->
<dependency>
<groupId>mysql</groupId>
<artifactId>mysql-connector-java</artifactId>
<version>8.0.29</version>
</dependency>
<!-- jdbc依赖-->
<dependency>
<groupId>org.springframework.boot</groupId>
<artifactId>spring-boot-starter-jdbc</artifactId>
</dependency>
<!-- mybatis-plus依赖-->
<dependency>
<groupId>com.baomidou</groupId>
<artifactId>mybatis-plus-boot-starter</artifactId>
<version>3.5.1</version>
</dependency>
<!-- JSON依赖-->
<dependency>
<groupId>com.alibaba</groupId>
<artifactId>fastjson</artifactId>
<version>1.2.70</version>
</dependency>
</dependencies>
<build>
<plugins>
<plugin>
<groupId>org.springframework.boot</groupId>
<artifactId>spring-boot-maven-plugin</artifactId>
<configuration>
<excludes>
<exclude>
<groupId>org.projectlombok</groupId>
<artifactId>lombok</artifactId>
</exclude>
</excludes>
</configuration>
</plugin>
</plugins>
</build>
</project>
yml配置文件:
#数据库连接配置
spring:
datasource:
driver-class-name: com.mysql.cj.jdbc.Driver
url: jdbc:mysql://localhost:3306/file_test?useUnicode=true&characterEncoding=utf-8&allowMultiQueries=true&useSSL=false
username: root
password:
jackson:
date-format: yyyy-MM-dd HH:mm:ss
# joda-date-time-format: yyyy-MM-dd HH:mm:ss
time-zone: GMT+8
thymeleaf:
prefix: classpath:/static
suffix: .html
cache: false
#启动端口
server:
port: 8100
Html前端静态页面(内置在springboot项目中可直接运行):
<!DOCTYPE html>
<head>
<meta charset="UTF-8">
</head>
<html lang="en">
<body>
<div id="app">
<div class="container-fluid">
<!--标题行-->
<div class="row">
<div align="center" class="col-sm-6 col-sm-offset-3"><button style="font-size: 18px;float: right" href="" class="btn btn-info btn-sm" @click.prevent="uploadFile()">上传文件</button><h1 class="text-center">文件列表</h1></div>
</div>
<!--数据行-->
<div class="row">
<div class="col-sm-10 col-sm-offset-1">
<!--列表-->
<table class="table table-striped table-bordered" style="margin-top: 10px;">
<tr>
<td align="center" style="font-size: 18px;">文件名称</td>
<td align="center" style="font-size: 18px;">文件路径</td>
<td align="center" style="font-size: 18px;">上传时间</td>
<td align="center" style="font-size: 18px;">操作</td>
</tr>
<tr v-for="user in list">
<td style="font-size: 18px;">{{user.fileName}}</td>
<td style="font-size: 18px;">{{user.filePath}}</td>
<td style="font-size: 18px;">{{user.uploadTime}}</td>
<td>
<button style="font-size: 18px;" href=" " class="btn btn-info btn-sm" @click="deleteFile(user.id)">删除</button>
<a style="font-size: 18px;" href=" " class="btn btn-info btn-sm" @click="downloadFile(user.id)">下载</a>
</td>
</tr>
</table>
</div>
</div>
</div>
</div>
<!-- 弹出选择文件表单 -->
<div id="my_dialog" class="my-dialog" style="display: none">
<h3>需要上传的文件</h3>
<form id="form1" action="http://localhost:8100/file/upload" target="form1" method="post" enctype="multipart/form-data">
<input type="file" name="file" accept=".jpg,.png,.gif">
<button type="button" style="font-size: 18px;" onclick="upload()">提交</button>
<button type="button" style="font-size: 18px;" onclick="cancelFile()">取消</button>
</form>
</div>
<style type="text/css">
.container-fluid {
width: 650px;
//height: 200px;
//background-color: orchid;
position: absolute;
top: 0;
left: 0;
right: 0;
bottom: 0;
margin: auto;
}
.my-dialog {
width: 300px;
//height: 200px;
//background-color: orchid;
position: absolute;
top: 0;
left: 0;
right: 0;
bottom: 0;
margin: auto;
}
</style>
</body>
</html>
<!--引入jquery-->
<script type="text/javascript" src="js/jquery-1.9.1.min.js"></script>
<!--引入axios-->
<script src="js/axios.min.js"></script>
<!--引入vue-->
<script src="js/vue.js"></script>
<script>
var app = new Vue({
el: "#app",
data:{
msg:"vue 生命周期",
list:[], //定义一个list空数组,用来存贮所有文件的信息
},
methods:{
uploadFile(){ //文件选择
/*悬浮窗口的显示,需要将display变成block*/
document.getElementById("my_dialog").style.display = "block";
/*将列表隐藏*/
document.getElementById("app").style.display = "none";
},
deleteFile(id){
/*alert("删除!");*/
console.log("打印数据"+id);
axios.delete('http://localhost:8100/file/delete',{
params:{
fileId:id,
},
}).then(response=>{
console.log("回调--->>>"+response.data);
if (response.data == "成功!") {
alert("删除成功!");
//跳转到显示页面
//document.referrer 前一个页面的URL 返回并刷新页面
location.replace(document.referrer);
} else {
alert("删除失败!");
//document.referrer 前一个页面的URL 返回并刷新页面
location.replace(document.referrer);
}
})
},
downloadFile(id){
window.open("http://localhost:8100/file/download?fileId="+id);
},
},
computed:{
},
created(){ //执行 data methods computed 等完成注入和校验
//发送axios请求
axios.get("http://localhost:8100/file/list").then(res=>{
console.log(res.data);
this.list = res.data;
}); //es6 箭头函数 注意:箭头函数内部没有自己this 简化 function(){} //存在自己this
},
});
cancelFile=function(){ //返回首页
/*浮窗口隐藏*/
document.getElementById("my_dialog").style.display = "none";
/*将列表显示*/
document.getElementById("app").style.display = "block";
};
function upload() {
/*alert('文件上传成功!');*/
$("#form1").submit();
//document.referrer 前一个页面的URL 返回并刷新页面
location.replace(document.referrer);
}
</script>
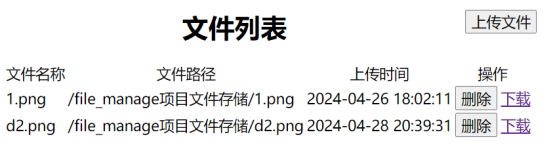
运行效果:

上传文件:

选择文件:
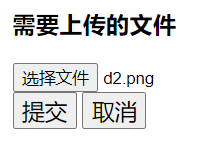
提交成功后;
![]()
列表新增一条数据:
点击下载选择保存位置:
![]()
点击删除后:
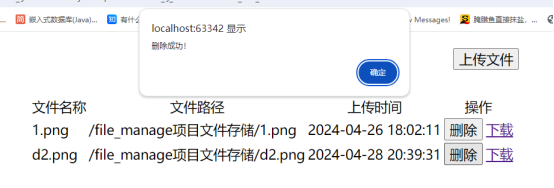
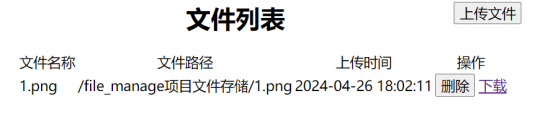
点击确定文件列表删除一条数据:
html静态页面需要js等文件,会放在完整项目里面,有需要的朋友自取。
完整素材及全部代码
代码已上传csdn,0积分下载,觉得这片博文有用请留下你的点赞,有问题的朋友可以一起交流讨论。
https://download.csdn.net/download/xuezhe5212/89238404